Familiarizing yourself with OpenScrape
When you started the OpenScrape program, two windows appeared. The “Main” window has the menu bar, the toolbar, and a display of the poker table image. The other window that appeared is the “TableMap Editor” window, and is where you will be doing most of your work with OpenScrape. The “TableMap Editor” window does not have a menu or toolbar, and has “TableMap” as its title.
File Menu
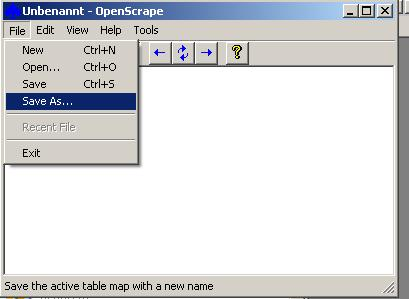
The File menu contains the standard Windows options to open and save Table Map files.
Edit Menu
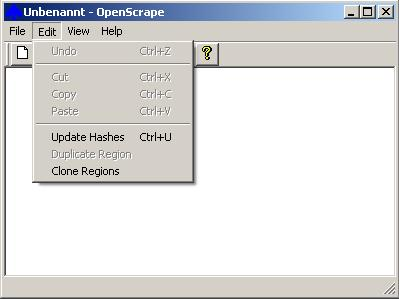
The Edit menu contains the standard Windows options, plus two options specific to OpenScrape:
- Update Hashes: This option will recalculate all the Hash records in the current map – useful if you have made changes to the underlying images, for example. More on Hashes later.
- Duplicate Region: This option will allow you to easily duplicate Regions. For example, once you have the player 1 card locations defined, you might want to copy those to players 2-10 to make things easier on yourself. More on Regions later.
- Clone Regions: This option will clone all regions of player 0 at once and even distribute them to reasonable positions at the table. All you have to do afterwards is fine-tune the positions a little bit. Prerequisite: the balance-regions of the other players must be defined in order to be able to determine the positions for the cloned regions.
View Menu
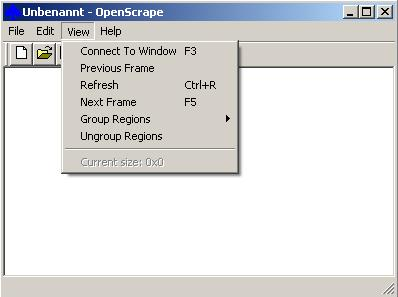
The View menu has following OpenScrape options:
- Connect To Window: This option duplicates the “Green Circle Button” on the toolbar, and will bring up a dialog to allow you to select which window OpenScrape will copy an image from.
- Previous Frame: if connected to OHReplay this option will switch to the previous replay-frame
- Refresh: This option duplicates the Black and White Arrow button on the toolbar, and will copy to current casino table image to the OpenScrape main window.
- Next Frame: if connected to OHReplay this option will switch to the next replay-frame
- Group Regions/Ungroup Regions: These options allow for customization of how Region records are displayed in the Table Map Editor window.
- Current size: Displays the client size of the window that OpenScrape is currently attached to. This is very useful when creating certain String records.
Main Toolbar

The toolbar on the main window performs the following actions, from left to right:
- New Table Map
- Open Table Map
- Save Table Map
- Connect to window
- Previous frame if connected to OHReplay
- Refresh the poker table image
- Next frame if connected to OHReplay
- Display Help/About
Keyboard shortcuts exist for many of these menu options and toolbar buttons, in addition to the standard Windows keyboard shortcuts:
- F1 – Help/About
- F3 – Connect to window
- F4 – Toggle Region box display on or off
- F5 – Refresh the poker table image
- Control + U – Update Hashes
Table Map: Buttons/fields. The Table Map Editor window has a plethora of information on it, and various fields and controls will become enabled or disabled, depending on the type of map record selected.
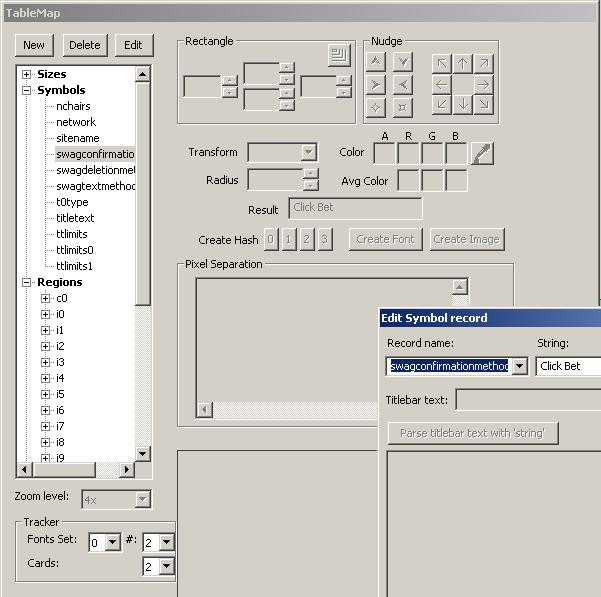
On the top left of the window are three buttons, New/Delete/Edit, that allow you to add new records to the map, remove records from the map, or edit records in the map. The “New” button will prompt you to add a record of the type that is selected in the tree display directly below. For example, if you have a Region record selected, clicking New will prompt you to add a new region record to the map. The “Delete” and “Edit” buttons operate on the currently selected record.
Directly below the New/Edit/Delete buttons is the record tree display. This box displays all records that are currently present in the map, and groups them by type. The Region records within this tree can be further sub-grouped using the View menu options on the main window. There are a number of choices for sub-grouping Region records, and are intended to improve the productivity of Table Map creation. Experimentation of these sub-groupings is necessary to see if any meet your personal needs.
Below the tree display is a drop down to select the zoom level of the image that is displayed in the big box on the bottom right portion of the window. The image displayed is dependent on the record type selected.
Below the Zoom Level are various drop downs that are used to serve as checklists for capturing fonts and card images. Capturing fonts and card images will be discussed later.
Creating and editing regions
On the top right of this window are a large group of controls, there is a “Rectangle” group, a “Nudge” group, and “Transform”, “Radius”, “Color”, “Avg Color” , and “Result” fields. These controls are used mainly for setting the parameters of Region records, and are only enabled when a Region record is selected in the record tree display on the left side of the window. The meaning of these fields will be described in the “Region” record section below. Some of these fields may display other relevant information, depending on the record type selected in the display tree. In addition to the arrow buttons a selected region can be moved and resized with hotkeys:
- arrow keys – move it around
- arrow keys + shift – moves it faster
- arrow keys + control – makes it bigger/smaller (can also use shift for faster)
Below this large group of controls are buttons to create Hash records, Font records and Image records. These buttons will be enabled/disabled appropriately depending on the record type that is selected in the display tree. For example, creating an Image record only makes sense if a Region record is selected in the display tree. Creating a Font record only make sense if a Region record with a text transform type is selected in the display tree.
The box below the Hash, Font and Image buttons is used to display “pixel separation”. The “+” and “-“ buttons to the right of this box control the size of the font used in this box. Pixel separation is used for regions that use font transforms. A good separation between foreground and background colors is imperative for good font recognition, and this box lets you preview that separation.



Recent Comments